In recent years, many breaches – including SolarWinds and Kaseya – share a common theme of attackers exploiting supply chain security weakness to introduce malicious software into the pipeline. There are methods for enforcing deployment of container images based on the so-called “trusted registry.” But there’s a potential compromise of the registry that would allow attackers to inject container images containing malicious software and packages into the production environment.
So, how can we ensure that only cryptographically signed and validated container images get deployed to avoid the potential abuse of the supply chain attacks? At Palo Alto Networks, we solved this problem with Prisma Cloud Admission Control Open Policy Agent (OPA) and Notary.
If one searches for ways to ensure that only the trusted cryptographically signed container images can be deployed in Kubernetes, most of the results mention Docker Content Trust (DCT). However, DCT is a Docker-only feature. Kubernetes has no native support for that and it’s deprecating the support of Docker runtime. In order to do this validation, there are a few blog posts inspiring us to look at the validating admission controller using Open Policy Agent (OPA) and notary service. Some of the posts are fairly technical and require the readers to install many components, e.g., OPA gatekeeper, webhooks, notary service with server/signer/database, and a policy script written in Rego configured in a Kubernetes configmap. Needless to say, it’s pretty complex to get it to work.
Luckily, we have Prisma Cloud’s support for Kubernetes admission control with Open Policy Agent that can help simplify the deployment. Prisma Cloud provides a dynamic admission controller for Kubernetes that’s built on the Open Policy Agent (OPA).
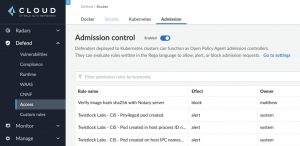
In Prisma Cloud Console, the rules written in Rego (OPA’s native language) can be managed and composed in the UI. Rules can allow or deny (alert or block) pods. Then Console pushes the policies to Defender agent, which enforces them. All decisions made by the system are logged.
Let’s look at all the components in detail.
The Tale of a Container Image
Most people use the container image name with a tag, for example – docker.io/library/alpine:3.1 – in their Kubernetes deployment. However, this tag can be reused if someone gets the access to the image repository and re-push the new content with the same tag. With trusted image validation, we need to refer to an image using the sha256 hash: <image>@sha256:<digest> format. Now, the question becomes: What if someone pushes a new image hash and also changes the deployment/pod image to the new hash? How do we verify the hash? The answer is – we have a list of the signed hashes in the Notary.
For this experiment, we are not going to deploy our own Notary service. Instead, we are using the official Notary server at notary.docker.io for Docker Hub. If the docker CLI is available in the system, try the following command:
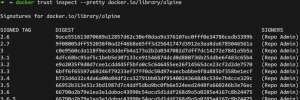
This is the list of the sha256 hashes we want to verify against if we are using the official alpine image.
Under the Hood
How can we do this hash validation when we have a new deployment or pod? This is where understanding Kubernetes Admission Controllers and API request lifecycle would help. A webhook for the validating admission can perform our automation with the Notary service. Here’s the architecture diagram for our demo:
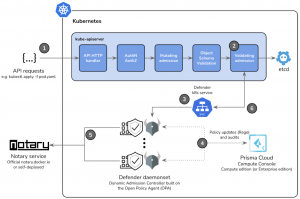
One: Whenever we use ‘kubectl’ to run a command with Kubernetes, we are actually submitting the APIs to the Kubernetes API server, specifically the kube-apiserver component in the Kubernetes master node. The request will go through a few more steps like authentication and authorization to see who’s making the requests and whether they are allowed to perform such requests. Another step is the mutation mission that can change the original resource specification, e.g., to inject a Istio proxy sidecar, or a Hashicorp vault agent init container in the pod spec.
Two: Eventually the request reaches our key step: validating admission. This step will submit requests to the external webhooks and get a verdict to see if we think the final version of the resource in the request is valid.
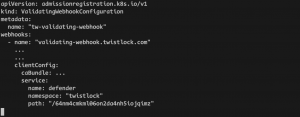
Three: In this case, our webhook is the defender daemonset sitting behind a Kubernetes service. Now one might wonder: How does the validating admission know there’s a webhook at the defenders? Actually, we need to configure this by applying a new ValidatingWebhookConfiguration resource in the cluster. This yaml is provided in the Prisma Cloud UI.
Four: By default, we have a number of Rego policies or rules deployed in the defenders. Also if a particular rule is triggered, an audit event log will be sent to the Prisma Cloud console UI. We love this feature. The policy can be written using Rego in the UI without re-configuring a configmap and it can be debugged using the “alert” mode. This can reduce the development time greatly.
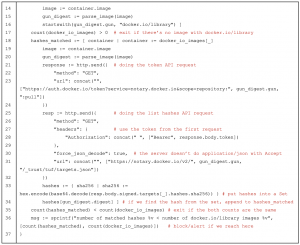
Five: Our customized Rego script is going to send a request to auth.docker.io for a token, and we use the token to send a /v2 API request to the Notary server at notary.docker.io to get a list of the sha256 digests for a specific image. We can’t use the “docker trust inspect” or “notary list” command here and have to use Rego’s http.send for making the API calls. The following screenshot shows the two requests we need to do for each image if we are using curl.
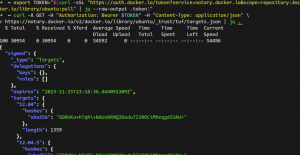
Six: Notice the sha256 value from the API is not in the same format as the ones in the digest list from the “docker trust inspect” command in figure 1. The string from the notary server API response is actually a base64 encoded string. In order to get the digest-like format, we need to run a base64 decode and hex encode in Rego (please refer to line 33 in Figure 6 below).
String from the notary API response (44 chars)
=> base64 decode to bytes
=> hex encode the bytes back to a string (64 chars for the sha256 hash)
At line 33 in Figure 6 below:
hex.encode ( base64.decode(resp.body.signed.targets[_].hashes.sha256) )
Eventually the OPA will give a verdict back to the validating admission to see if we want to persist the resource specification to the etcd for the Kubernetes scheduler.
Show Me the Rego Script
As mentioned, editing the Rego script is very straightforward in the Prisma Cloud console UI. Here’re the screenshots of the Admission Control in Prisma Cloud:
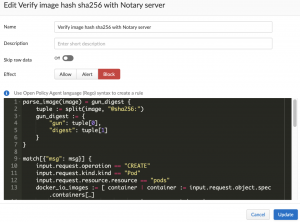
Here’s the script:
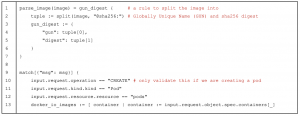
This script can be used as a reference and this was tested with Prisma Cloud self-hosted Compute Console version 22.1.840 (the equivalent Prisma Cloud Enterprise Edition which is our SaaS console is 22.2.1 release).
If you want to try this, you may need to modify it for your own environments and use cases as you see fit. For example, you may want to enforce every image in the form of <image>@sha256:<hash> and the <image> needs to have a full repository name, e.g., docker.io/library. The above Rego script is not doing that. Instead, it’s only counting the number of images prefixed with docker.io/library, and verifying these specific images using the hashes from the notary server.
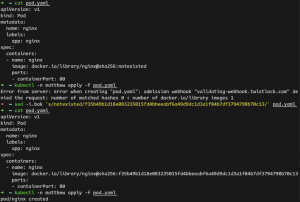
The following are the results of pod deployment with/without the right sha256 hash.
As shown, the deployment with an image that does not have a matching of the hash in Notary server fails, as expected. On the other hand, a deployment with a validated image that consists of the hash in the Notary server succeeds.
Feeling Inspired?
In our opinion, this is as easy as it can get. Can you imagine the need to introduce another section of OPA gatekeeper or do a docker-compose/helm for the self deployed notary server/signer with a mariaDB?
If you’re considering protection against container image supply chain attacks, you may want to try this out for your use cases. We plan to roll this out in our own IT environments over the next month or so. Hope this is useful. And please also check out our video of a live demo if you prefer to see this in action. Until next time!
Matthew Kwong is a Principal Software Engineer at Palo Alto Networks.
Binh Phan is a Cloud Security Solutions Architect at Palo Alto Networks.


